
Automating a turntable is a challenge, because of the way the Fleischmann turntable (essentially the only commercial model available for N-gauge) works. It's driven by a DC motor using a kind of latch pin released by a solenoid and detected by a microswitch to stop it exactly in the right places. The drive system only knows the turntable is in a legal parking position but not which one. There are mods you can do by fitting a stepper motor or by replacing the mechanical latch with an optical encoder disc, but either way it's a lot of messing about.
After trying to lash something up with diodes, relays and reed switches, I tried the Littfinski TT-DEC, a decoder that takes the relatively crude (and noisy) approach of letting the latch pin fall into each notch as it passes, thus reliably tracking how many positions it has moved. Whilst the motion isn't silky smooth, it isn't as jerky as you might expect, and the only real disadvantage is the constant clicking of the pin as the table moves.
- Details
- Category: Railways
Digital, because I wanted to try it out, and because I liked the idea of incorporating some degree of computer control.
With hindsight, the combination of N-gauge with digital does impose some limitations I wasn’t anticipating: reduced choice of decoders; limitations on extra functions; fiddliness of installing decoders yourself if the loco doesn’t have a built-in interface. But on balance I think it’s worth it.
After a small-scale test with a loop of track and one loco, I decided that I was going to stick with digital.
At the moment, I’m using an Intellibox, loco decoders mostly also from Uhlenbrock, and a mixture of Tams and Littfinski decoders for points and signals. For the point decoders, I soon found that you do have to follow the manufacturer’s advice and connect the power supply direct to the transformer, rather than using the digital signal, otherwise there isn’t enough oomph to keep the fleischmann point motors working when they get a little stiff.
Feedback is by current detection, using Uhlenbrock Loconet modules (63340). I chose this approach as more elegant than reed switches and magnets, and it seems to work well, but it does work out fairly expensive. A minor drawback is that you have to make carriages and wagons draw some current so that they can be detected. Slightly to my surprise, the classic solution of putting a dab of resistive paint on the axle over the insulated wheel hub actually seems to work rather well, and only takes a few moments per axle.
One thing you discover very quickly is that the idea that you only need two wires for digital is a myth. Fortunately, I’m in a position to buy wire of the right colour and thickness nowadays, rather than scrounge around for whatever discarded bits and pieces I could find, as I did when I was younger. Something else that makes life a lot easier is a staple gun for pinning wires and cables to the underside of the layout.
- Details
- Category: Railways
Carpentry not being a strong point for me, I was on the lookout for an easy fix to provide the basis for my layout, and found it in a large Swedish furniture store that offers a range of solid-looking and reasonably inexpensive wooden tabletops and legs. I don’t pretend that this is an optimal solution, but it provides a smooth, level surface and demands a lot less skill than the traditional open framework construction.
The available space being long and narrow, I bought two 2m x 0.6m tabletops for the main part of the layout, and two 1m x 1m corner units to support the wider 180 degree loops at each end of a “dog-bone” style layout. It would be possible to fit a curve into 0.6m by using the smallest N gauge radii, but I wanted to avoid this if possible. A width of 1m allows you to use Fleischmann R3 and R4. The tabletops are supported on adjustable legs. I chose these simply because they are longer than the standard legs and allow you to mount the tables at a convenient working height. Since my floor is fairly level, the adjustability is more of nuisance than a help.
The tables are secured to each other by hinges with removable pins. Track and electrics are also arranged so that the tables could be separated if required, although this would only be likely to happen if I move house or decide to extend the layout (or get bored with it and put it into store).
- Details
- Category: Railways
The track so far is all Fleischmann — not necessarily the cheapest, but it looks quite good with the ballasted base, and it’s widely available. The curves and station pointwork are in fixed geometry track, while most of the straight sections use flexi-track to reduce the number of rail joints.
As the layout was designed from the start for computer control, I put in a lot of insulated rail joiners to provide isolated sections for current detection.
Having pinned down the track, I found that a problem with the Fleischmann track elements is that the points have a slightly thicker base than the standard track elements. When you attach it to a hard surface, like my pine tabletops, these “steps” in the track base lead to uneven running, and need quite a bit of fiddling with thin cardboard spacers to sort out.
For ballast between the tracks, I’ve used Noch ballasted paper as a quick fix for the straight sections, and for the curves and fiddly bits granite chippings with the traditional dilute glue solution and pipette technique.
- Details
- Category: Railways
Background
I still have a few boxes of bits and pieces from the TrixExpress H0 layout I had when I was younger. The old layout wasn’t very big, and a good deal of the track and buildings were damaged in dismantling the layout or during the subsequent years of storage, so there wasn’t enough there to form the basis of a new project.
Since Trix Express equipment is — to say the least — difficult to find these days, and since I don’t really feel committed to large wheel flanges and the third-rail any more, any new project would be free to strike out in a new direction. I have pursued a lot of railway interests of different sorts over the years: some directions it might have been interesting to go in included:
- Swiss metre gauge: H0m models and matching track are easier to find than they used to be, and I have worked a lot on modelling the RhB in particular for Rail3d. Of course, this would require a layout with plenty of scenery!
- Trams: Always fun, and I do have a few tram models built from kits over the years. Last time I attempted to build a tram layout I gave up in frustration at the difficulties of building track (not to mention being distracted by having a PhD thesis to write…).
- A nostalgic British-style layout of the gwr branchline type. There’s a lot to be said for this sort of thing, where you keep the technical part as simple as possible and focus on recreating an accurate scale model of a little bit of rural England in the 1920s.
In deciding what sort of project stood a reasonable chance of reaching a “usable” stage, I had to bear in mind that my skills incline more towards electronics and computing than advanced carpentry.
The Project
After some thought, and a lot of sketches on backs of envelopes and trial layouts designed in XtrkCAD and Rail3d, I decided that I would go for a relatively simple layout, in structural terms, with the focus on operations and signals. In the first instance, all the track would be on the level. To be able to operate decent-length trains in the available space and avoid the use of ridiculously short radius curves, I decided to go for N gauge. And of course control would be digital — that came in about the time my last project was dismantled, and I’ve always wanted to try it.
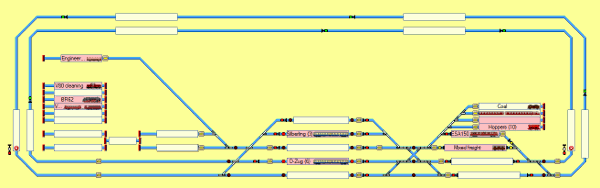
Layout diagram (schematic)
N gauge does have its limitations, of course: there is much less choice of rolling stock and scenic models available than in H0; it’s more difficult to build or modify models yourself; there isn’t space inside the average N gauge loco or railcar for most of the electronic bells and whistles that are on offer nowadays; dust and dirty track are more likely to be a problem.
It looked as though I ought to be able to find enough N gauge models to provide for interesting and varied operation on a moderately-sized layout, provided I picked the right period and place. Fortunately, this was easy: West Germany around the end of the 1960s (Epoche III/IV). This is a period I remember well from childhood holidays spent in the Ruhrgebiet, with a good mixture of steam and diesel or electric traction still around. It’s also a period that is reasonably-well supported by the big German manufacturers (Fleischmann, Minitrix, Arnold, etc.).
- Details
- Category: Railways
Subcategories
Page 2 of 4
- You are here:
-
Home

- Railways